Battery switch on travel trailer function is crucial for managing your RV’s power. Understanding how to use it properly ensures safe and efficient operation of your trailer’s electrical systems. This guide will walk you through the various types of switches, their operation, troubleshooting common problems, and essential maintenance tips. Whether you’re a seasoned RVer or a newbie, mastering your battery switch is key to a smooth and enjoyable camping experience.
We’ll cover everything from connecting and disconnecting batteries safely to integrating your switch with other systems like solar panels and inverters. We’ll also delve into troubleshooting common issues and provide a step-by-step guide to replacing your switch if needed. By the end, you’ll be confident in your ability to manage your travel trailer’s power supply effectively.
Understanding Battery Switch Functionality in Travel Trailers: Battery Switch On Travel Trailer Function
Your travel trailer’s battery switch is a crucial component for managing your power supply, ensuring you can safely use and protect your batteries. It’s essentially a control center that lets you choose which battery bank (or banks) provide power to your trailer’s systems and which are isolated to prevent accidental discharge. Understanding its function is key to enjoying worry-free camping trips.Battery switches in travel trailers allow you to select which battery bank powers your trailer’s appliances and systems.
This is especially important for those with dual battery setups, one for house functions and another for starting the tow vehicle. Properly managing your battery switch prevents draining your starting battery, leaving you stranded. They also offer a means to disconnect all batteries from the trailer’s electrical system for safety and storage.
Types of Battery Switches
Several types of battery switches cater to different needs and setups. The most common are single, dual, and multi-bank switches. Single switches are simple on/off mechanisms, ideal for trailers with only one battery. Dual switches manage two batteries, typically a house battery and a starting battery. Multi-bank switches offer greater control, allowing you to isolate individual banks or combine them as needed.
More complex systems might incorporate battery isolators or automatic switching systems for even more refined control.
Internal Components and Workings of a Battery Switch
A typical battery switch consists of several key components working together. At its core, it’s a series of heavy-duty switches or relays, each capable of handling significant current. These switches are connected to terminals where your battery cables are attached. Turning the switch to a particular position connects the corresponding battery or batteries to the trailer’s electrical system, while other positions isolate those batteries.
The switch’s housing provides protection and safe connection points. The internal mechanism uses robust contacts to ensure reliable connections and minimize voltage drop. Properly sized switches are essential to prevent overheating and damage.
Proper Use of a Battery Switch
Using your battery switch correctly is crucial for preserving your battery life and preventing electrical problems. Before connecting your trailer to shore power, turn the battery switch to the “off” or “storage” position to prevent accidental discharge. Once connected to shore power, you can switch to the position that connects your house battery to the trailer’s electrical system. When disconnecting from shore power, switch to the “off” or “storage” position.
If you have a dual battery setup, be sure to understand which position powers your house systems and which powers the starting battery. Always refer to your trailer’s owner’s manual for specific instructions on your particular battery switch model. Regularly inspect your battery switch for signs of corrosion or damage.
Connecting and Disconnecting Batteries
Connecting and disconnecting your travel trailer batteries involves using the battery switch, a crucial component for managing power and preventing accidental drain. Understanding this process is essential for safe and efficient RV operation. Properly connecting and disconnecting your batteries will protect your electrical system and ensure your appliances function correctly.
The process for connecting and disconnecting your batteries depends on the type of battery switch you have. Most RVs utilize a switch that allows you to select between the house batteries, the vehicle’s starting battery, or both combined, and an “off” position. To connect your house batteries, simply turn the switch to the appropriate position. To disconnect them, turn the switch to the “off” position.
Always double-check the switch’s position before performing any electrical work on your RV.
Safety Precautions When Working with RV Batteries
Working with RV batteries requires caution due to the potential for explosions and burns from leaking acid. Always wear appropriate safety gear, including eye protection and gloves, when handling batteries. Ensure adequate ventilation to prevent the buildup of potentially explosive hydrogen gas. Never allow sparks or flames near the batteries, and avoid touching the battery terminals with bare skin.
If you notice any signs of corrosion on the terminals, clean them carefully using a wire brush and baking soda solution. Always disconnect the negative terminal first when removing a battery and reconnect it last when installing a battery.
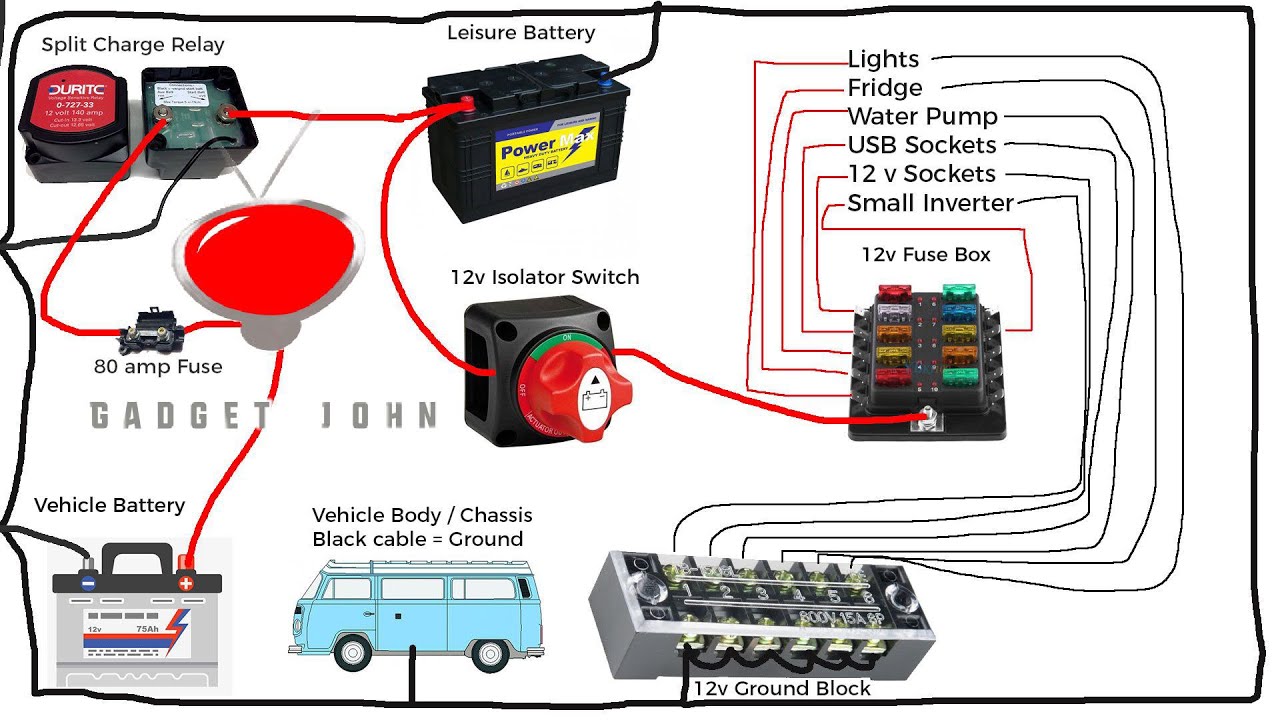
Typical Battery Wiring Diagram
Imagine a simple diagram. Your RV’s chassis ground is the central point. From there, a heavy-gauge wire runs to the negative (-) terminal of each house battery. Another heavy-gauge wire connects the positive (+) terminal of each house battery to the battery switch. From the switch, a wire runs to the positive (+) terminal of your RV’s power distribution center.
A separate wire connects the vehicle’s starting battery to its own dedicated system, typically not controlled by the battery switch. Finally, a ground wire runs from the power distribution center back to the chassis ground.
| Battery Switch Type | Advantages | Disadvantages | Typical Use Case |
|---|---|---|---|
| Single-pole, double-throw (SPDT) | Simple, inexpensive, easy to install | Only allows for connecting one battery at a time or combining both. No “off” position to fully isolate the batteries. | Smaller trailers, simple setups |
| Double-pole, double-throw (DPDT) | Allows for selecting either battery bank individually or both combined, and includes an off position | More complex, slightly more expensive than SPDT | Most common type for travel trailers |
| Rotary Battery Switch | Multiple positions for flexible control, often includes a “both”, “off”, and “battery 1/2” position | More expensive, can be more complex to install and understand | Larger RVs with multiple battery banks |
| Automatic Battery Switch | Automatically switches between batteries based on voltage levels, preventing deep discharge | Most expensive, requires more advanced installation | High-end RVs, demanding power requirements |
Troubleshooting Common Battery Switch Issues
Your travel trailer’s battery switch is a crucial component, ensuring you can seamlessly switch between your tow vehicle’s charging system and your trailer’s house batteries. Problems with this switch can leave you with dead batteries and a frustrating camping experience. This section will guide you through identifying and resolving common issues.Troubleshooting a malfunctioning battery switch involves a systematic approach, starting with the simplest checks and progressing to more involved diagnostics.
Remember to always disconnect the negative battery terminal before working on any electrical components to prevent shocks or short circuits.
Identifying Common Battery Switch Problems
Several issues can prevent your battery switch from functioning correctly. Corrosion is a frequent culprit, building up on the terminals and hindering the flow of electricity. Loose connections, either at the switch itself or at the battery terminals, can also interrupt the circuit. A faulty switch, due to wear and tear or damage, is another possibility. Finally, a blown fuse within the switch’s circuitry can also cause the switch to appear non-functional.
Identifying the specific problem is the first step to a successful repair.
Troubleshooting Steps for a Non-Functional Battery Switch
Let’s walk through a step-by-step process to diagnose your battery switch problem. This process is best followed in order to isolate the problem efficiently.First, visually inspect the battery terminals and the switch itself for corrosion. Look for white, powdery buildup or green discoloration. If present, clean the terminals with a wire brush and baking soda solution. Next, check all connections for tightness.
Ensure that all cables are securely fastened to the terminals and the switch. If any connections are loose, tighten them. Then, inspect the switch itself for any signs of physical damage, such as cracks or broken components. If damage is visible, the switch will need to be replaced. After completing these visual inspections and tightening connections, test the switch functionality.
If the problem persists, check the fuse associated with the battery switch. This is usually located in a fuse box near the switch or in the main power distribution center. Replace the fuse if it’s blown. If the problem continues after these steps, it’s likely the switch itself needs replacing.
So, you’re hitting the road in your travel trailer? Awesome! First things first: make sure you understand the battery switch on travel trailer function to avoid any dead-battery surprises. Once you’ve got that sorted, it’s time to think about entertainment. For the ultimate mobile listening experience, check out this guide on setting up an audiophile travel aetup – because even on the road, your tunes deserve the best!
Resolving Common Battery Switch Problems
The solutions are generally straightforward. Corrosion can be effectively removed using a wire brush and a baking soda and water paste. Simply scrub the terminals until they are clean and shiny. Loose connections require tightening, and this is usually done with a wrench. A damaged switch needs to be replaced with a new one of the same type and amperage rating.
Always remember to disconnect the negative battery terminal before working on any electrical components. Replacing a blown fuse involves simply inserting a new fuse of the correct amperage. Remember to match the amperage rating of the replacement fuse to the original fuse. Incorrect amperage can lead to further damage.
So, you’re prepping for a road trip? Awesome! First things first: make sure your travel trailer’s power is sorted. Check out this guide on the battery switch on travel trailer function to avoid any dead-battery surprises. Then, if you’re an audiophile like me, you’ll want to consider your in-travel listening experience. A great audiophile travel setup can make all the difference in enjoying your favorite tunes on the open road.
Proper planning makes for a smoother, more enjoyable trip!
Battery Switch Maintenance and Replacement

Keeping your travel trailer’s battery switch in good working order is crucial for reliable power. Regular maintenance prevents problems and extends the life of your switch, saving you time and money in the long run. Neglecting maintenance can lead to corrosion, poor connections, and ultimately, switch failure.
Routine Maintenance Schedule, Battery switch on travel trailer function
A simple, regular maintenance schedule will significantly improve the lifespan of your battery switch. Aim to inspect your battery switch at least twice a year, or more frequently if you live in a particularly humid or corrosive environment. This inspection should include a visual check for corrosion, loose connections, and any signs of damage. Additionally, a more thorough cleaning and inspection should be performed annually.
This annual check should include testing the switch’s functionality to ensure it’s properly isolating and connecting the batteries.
Cleaning and Inspecting the Battery Switch
Cleaning your battery switch is a straightforward process that can prevent many problems. Begin by disconnecting the batteries to ensure safety. Use a wire brush or a dedicated battery terminal cleaner to remove any corrosion from the switch terminals and surrounding area. Pay close attention to any areas where corrosion may be building up, particularly around the switch’s connection points.
A baking soda and water paste can also be effective at neutralizing corrosion. After cleaning, apply a dielectric grease to the terminals to prevent future corrosion and improve conductivity. Visually inspect the switch itself for any signs of damage, cracks, or loose components. If you notice any issues, it’s best to replace the switch rather than risk further problems.
Replacing a Faulty Battery Switch
Replacing a battery switch is a relatively simple task, but safety is paramount. Always disconnect the batteries before starting any work. Take photos or make detailed notes of the wiring connections before disconnecting anything. This will help ensure you reconnect everything correctly. Carefully remove the old switch, noting how it’s mounted and wired.
Install the new switch, ensuring it’s securely mounted and the wiring is correctly connected. Double-check your work before reconnecting the batteries. If you’re unsure about any step of the process, consult a qualified electrician or RV technician.
Tools and Materials for Battery Switch Replacement
Before beginning the replacement, gather the necessary tools and materials. Having everything prepared beforehand will make the process much smoother and safer.
- New battery switch (ensure it’s the correct amperage rating for your system)
- Wire brush or battery terminal cleaner
- Dielectric grease
- Screwdrivers (appropriate sizes for your switch and wiring)
- Wrench (if necessary for disconnecting battery terminals)
- Safety glasses
- Gloves
- Optional: Multimeter to test the switch after installation
Mastering your travel trailer’s battery switch is more than just flipping a switch; it’s about ensuring safe and efficient power management for your adventures. From understanding the different types of switches and their functions to troubleshooting problems and performing routine maintenance, this guide provides a comprehensive overview. Remember to always prioritize safety when working with RV batteries and electrical systems.
With a little knowledge and attention to detail, you can keep your RV’s power running smoothly for years to come, allowing you to enjoy worry-free camping trips.
FAQ Section
What happens if I leave the battery switch on all the time?
Leaving the switch on constantly can drain your batteries, especially if there’s a parasitic draw from something like a faulty appliance. It’s best to turn it off when not in use.
How often should I clean my battery switch?
Inspect and clean your battery switch at least once a year, or more often if you notice corrosion or buildup. A simple cleaning with a wire brush and baking soda solution will often suffice.
Can I use a different type of battery switch than what came with my trailer?
You can, but ensure the replacement switch has the correct amperage rating and is compatible with your trailer’s electrical system. Consult a qualified RV technician if unsure.
My battery switch is making a clicking sound. What’s wrong?
A clicking sound usually indicates a weak battery or a problem with the switch itself. Check your battery voltage and inspect the switch for loose connections or corrosion. If the problem persists, seek professional help.
